X-ray image from sensor
When
a X-ray hardware device and it's plugin is installed, a continuous group of
tools will be added to the toolbar. A new menu item will also be added to the
Tools menu.
 belongs to an X-ray sensor.
 A click on  activates the sensor and the dot
turns green.
activates the sensor and the dot
turns green.
activates the sensor and the dot
turns green. A click on deactivates the sensor and the
dot turns red.
deactivates the sensor and the
dot turns red.
deactivates the sensor and the
dot turns red. A click on shows the sensor settings.
Hardware devices for X-ray capture will all have unique options and require
different routines for best results. Please refer to your hardware manual and
your reseller for more info.
shows the sensor settings.
Hardware devices for X-ray capture will all have unique options and require
different routines for best results. Please refer to your hardware manual and
your reseller for more info.
shows the sensor settings.
Hardware devices for X-ray capture will all have unique options and require
different routines for best results. Please refer to your hardware manual and
your reseller for more info. This is an example of a plugin setup
window, the settings that could be changed by a user are explained here the
other should not be touched without knowledge about the effects:
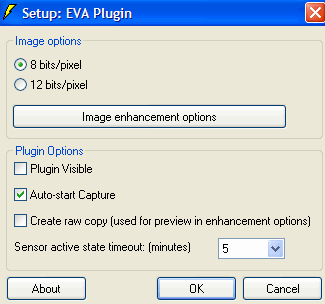
Image options - Refers to the way the
images will be stored, 8 bits/pixel makes the resulting file much smaller but
does not have the same grayscale depth as a 12 bit image. It is important to
mention that the image enhancements that are done on the image when captures is
always done in the highest available bitdepth. The result is then saved in
either a 8 or 12 bits/pixel.
Plugin visible - Shows a plugin window on
the screen while it is activated.
Auto-start capture - When DentalEye is
launched the sensor is automatically activated. Rem: under Preferences - Capture you may setup the
plugin to activate automatically as soon as a new patient is selected.
X-ray image from an Image plate
scanner (PSP scanner) with the Developer
The
Developer is used in a network where one image source is connected to a computer
that is shared by several users. Such as a centrally placed X-ray scanner that
is accessed from several treatment rooms.
The purpose of the Developer is to make
capturing images with a shared X-ray equipment as easy as possible.
Set up the system in System - Preferences - Network
The computer with the shared equipment is
set up as a Developer server with a certain ID number. The computers in the
different treatment rooms are set up as Clients to a Developer with the same ID
number as the Developer server.
It is possible to have more than one
Developer server set on the same ID number. This way several image sources can
be shared in the same practice. In larger systems with several workgroups having
their own shared equipment, it will be practical with different ID numbers for
each workgroup.
Color Image from Video
device
When
the required hardware is installed, a continous group of tools will be added to
the toolbar under the menu bar.
The group![]() belongs to the video source. A
click on
belongs to the video source. A
click on ![]() activates the video and the red dot turns green. Rem. you may set up
the video plugin to launch automatically. A click on
activates the video and the red dot turns green. Rem. you may set up
the video plugin to launch automatically. A click on ![]() shows the video plugin settings.
This is usually done at installation and is not explained here.
Go to a presentation of the installation procedure of the Video plugin.
shows the video plugin settings.
This is usually done at installation and is not explained here.
Go to a presentation of the installation procedure of the Video plugin.
Color Image from a Digital camera (Autoimport
plugin)
There is a plugin available the makes it possible to automatically
import images from any drive that can be reached from the computer, it may be a
harddrive on a computer with a digital Panoramic device or a digital camera or
image card reader. The purpose is to simplify the often cumbersome handling of
images in digital form. the Autoimport plugin can be setup to import and clear
the images from the source without a single keystroke.
The group  belongs to the Autoimport plugin. A click on
  activates the
plugin to import the images. The button is available if the plugin
needs to be manually deactivated. A setup window is reached from .
activates the
plugin to import the images. The button is available if the plugin
needs to be manually deactivated. A setup window is reached from .
belongs to the Autoimport plugin. A click on activates the
plugin to import the images. The button is available if the plugin
needs to be manually deactivated. A setup window is reached from . 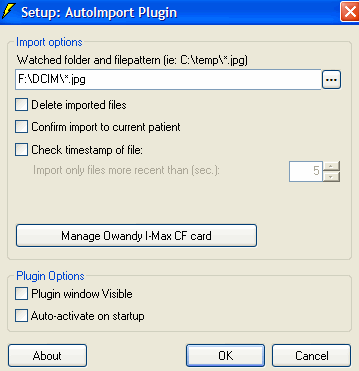
Watched folder - is the full path to where the images will be
situated.
Delete imported files - This option actually clears the source of
the images that has been imported and thereby makes the memory card in the
digital camera fully available for the next patient.
Confirm import to current patient - Gives you a second chance to
check that the right patient is selected before the images are imported.
Check timestamp of file (together with the window for seconds) -
Makes it possible to setup so that only the most recent images are imported. The
images in the source will not be deleted.
Plugin visible - Shows a plugin window on the screen while it is
activated.
Auto-start capture - When DentalEye is
launched the sensor is automatically activated. Rem: under Preferences - Capture you may setup the
plugin to activate automatically as soon as a new patient is selected.
Go to a presentation of the Autoimport plugin.