Create Custom Templates
Create and edit templates
A
template is created by the arrangement of one, or several image frames, on an
image card. Check teeth contents for the tooth groups that are to be included in
the template. If they do not suit your needs go to Show/Edit anatomic
description and make necessary changes.
(If you have special settings for this
particular template, you can reset the tooth group list, once the template is
ready. This will not affect the newly created template.)
Create new templates
1
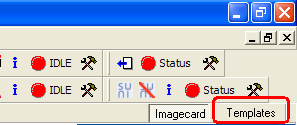
Open the Template manager window with a click on the Templates
tab.
An empty work space named New Template is
opened as default. If you prefer to use an existing template to create a new
template click on the template in the Taskpane, in order to keep the used
original template click on the Save as icon  and give the the template a new
name.
and give the the template a new
name.
and give the the template a new
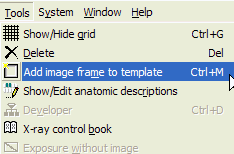
name. 2 Add frames
In the Tools menu Add image frame to
template or use <Ctrl>+<M> for the number of
frames needed in the template. The frames will appear on top of each other at
the top left corner.
3 Once the series of frames is completed,
place the frames (drag and drop) in the way you want the resulting image
card to look. Size can be adjusted one frame at a time, by dragging any corner.
To display a grid that will help to place frames evenly click on the grid icon
 In
many cases it is simpler to take the images in the size they come and place them
in the desired arrangement against the upper left corner. Resizing can then be
done collectively by moving the edges of the image card towards the
frames.
In
many cases it is simpler to take the images in the size they come and place them
in the desired arrangement against the upper left corner. Resizing can then be
done collectively by moving the edges of the image card towards the
frames.
In
many cases it is simpler to take the images in the size they come and place them
in the desired arrangement against the upper left corner. Resizing can then be
done collectively by moving the edges of the image card towards the
frames. 4 Now change the properties to your
needs, mark the frame you are to change.
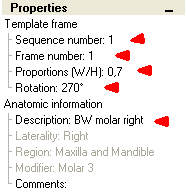
Sequence number X tells DentalEye that
the X:d captured image shall be placed in this frame and get the properties for
this frame.
Frame number is just DentalEye:s way to
number this frame.
Proportions designates the relation
between widht and height for the image. An image that is displayed in landscape
(horizontal) mode normally has 0,7 as the proportion.
Rotation - Set the Rotation for
correct presentation of the images on the screen. If you are unsure of the
required rotation, leave the field as is and perform a test run as described
under the topic Test run. Intraoral sensor images are normally displayed right
(rotation 0°) when the cord is aiming down.
Anatomic description - chose the right
anatomic description from the list made up in Show/edit anatomic
description.
5 Save the new template by clicking the
icon Save as or if the template already has a name Save .
or if the template already has a name Save . The window Save template appears
suggesting a name for the template. Choose an instructive name containing
relevant information, i.e. ”BW 4 horizontal” (Bitewing series of 4 images
using a sensor horizontally.) The template list is updated with the new
template.
Edit templates
1 Select by clicking on a template in the
Template list
2 To add a new frame, click the Add
image frame to template button or <Ctrl>+<M>.
3 To make changes within a frame, click
the frame and make desired changes
4 Click the Save or the Save
as button (Look at step 5 above).